Upgrading the firmware in a Sonoff POW over wireless
The Itead Sonoff POW mains power control / measurement devices are a very nice idea, but many people (myself included) don't like the idea of control of the equipment in their own house being:
- managed by some oriental cloud service provider
- dependent on Internet connectivity to the house
Therefore a number of people have worked out how to replace the standard firmware in these devices with open source firmware which simply talks on the local network, is not dependent on an Internet connection (unless you choose to control it from somewhere else, but at least it's now your choice rather than the only way of doing it), and is, well, open source, so therefore a bit more trustworthy regarding what it's doing and why.
The replacement firmware I'm going to discuss here is Sonoff Tasmota.
I've read several articles about loading this firmware onto the Sonoff devices, most notably:
However, when I came to try doing this with my first Sonoff POW, I found several things which were not clear to me (starting with the rather simple aspect of how to get the wires connected), as well as a couple which didn't seem to work as advertised, therefore I've written up the steps I followed to get this working.
Objective
The purpose of these instructions is to start from a newly-purchased Sonoff POW and end up with the device running the Tasmota open source firmware and talking to your local wireless network. The instructions also avoid opening the unit or having to solder anything to the PCB.
Assumptions
- You have a functional but unused Sonoff POW
- You do not want the POW to connect to the Itead cloud service
- You do not want the POW to upgrade its native firmware
- You do not want to open the case (other than removing the cover which protects the mains wire connections)
- You do not want to solder anything to the Sonoff
Requirements
- A Sonoff POW (!)
- A mains cable ending in bare wires with a plug suitable for your local power sockets on the other end
- A medium-sized crosspoint and a medium-sized flat-head screwdriver
- A wireless access point which, if you're at least moderately paranoid, has no connection to the Internet
- A computer which can connect to the access point (by cable or wireless, doesn't matter), and can also connect to other wireless networks at the same time (so, you'll need two network interfaces, one wireless and the other either wireless or cabled)
- Just for reference, a Raspberry Pi works fine for this task
- Also useful is some device which can scan for wireless networks and tell you what is available (I use Wifi Analyzer on an Android tablet)
Overview
The firmware update operates in quite a complicated way (mainly because the Sonoff switches several times between being a wireless Access Point and being a client connecting to another Access Point during the process). The following is a summary of the sequence of events involved in updating the firmware:
- On a computer that is both accessible via some wireless network, and can connect to a different wireless network, you run the SonOTA Python script and enter the authentication credentials for the wireless network via which this computer is accessible
- Put the Sonoff into AP mode and connect to it from the same computer (still running the SonOTA Python script)
- this will upload the configuration details for the firmware uploader to the Sonoff so that it can perform the next stage:
- Allow the Sonoff to connect to your wireless network and download the first part of its new firmware (from the computer running the SonOTA Python script)
- at the end of this stage, the Sonoff will again start acting as an Access Point, but with a different SSID from before
- Connect the computer (still running the SonOTA Python script) to the new Access Point
- this will download the second part of the new firmware from the SonOTA Python script
- Finally, the Sonoff will restart as an Access Point with yet another SSID, to which you can connect and use a browser to do the final bit of configuration.
- at the end of all this, the Sonoff will connect to your wireless network as a client once again, will be running a web server via which it can be configured, and will start trying to send MQTT messages.
Note that none of the above involves access to the Internet.
A note about instructions
I like instructions which are thorough:
- ones which don't just say "connect your laptop to the wireless network", but tell you what SSID to look for and what password to use
- ones which don't just say "connect the Sonoff to the power", but tell you how to operate the slightly odd little connector levers where you put the wires in
- ones which don't just say "download the repo using git clone", but tell you what commands to actually type on your computer to get the data/software you need
Oh, some things in these instructions require root access on the computer, some don't - anything which does require root access is marked with an R. If there's a question mark after the R, it means you might need to be root, or you might not, depending on how you go about doing it (eg: connecting to a wireless network). I tend to prefer command-line ways of doing things; these generally require root privilege. If you use GUI tools to do the same thing, they may well work as a standard user.
So, here goes…
Connect power to the Sonoff
Remove the single crosspoint screw from the cable entry cover on the Sonoff, underneath which you will find a connector strip for 6 wires, labelled from left to right:
- Live (output)
- Earth
- Earth
- Neutral
- Neutral
- Live (input)
The two earth pins are connected directly to each other, and the two neutral pins are connected directly to each other, so you can use either of each for the input and the output wires. Only the live wires need to be connected with the mains plug going to the one on the right, and the appliance (or the socket into which you connect an appliance) on the left.
Remove around 5-8 mm of insulation from the end of each wire of a mains cable and twist the strands together, then press down on the lever above the corresponding hole in the connector, insert the wire as far as it will go (they go in further than I had expected from looking at the connector block) and release the lever.
Make sure the wire doesn't come out again (at least, not with less than unreasonable force).
Do not plug a cable with bare wire ends into a mains socket.
If you're planning to upgrade several Sonoffs using the same cable, you might want to tin the ends of the wires with solder before inserting them, to make them a bit more robust than simply having twisted strands.
For the purposes of upgrading the firmware, you only need to apply input power; you do not have to connect a load of any sort to the output terminals.
Replace the cover, which contains a cable clamp, and screw it back in place before even thinking about putting the plug into a mains socket.
Prepare the laptop (or other computer which can connect to a wireless network)
The Access Point in the Sonoff is time-limited (the AP turns off after 3 minutes and needs to be restarted manually), so before putting the Sonoff into AP mode, it's a good idea to have your laptop ready to connect, to avoid wasting time once the AP clock is ticking (as it were).
Install the software
R Make sure you have the following packages installed on your machine (these package names are for Debian / Devuan / Ubuntu; if you use a different distribution you may need to adjust the names as appropriate, however since I don't run your distribution, I can't tell you what those names need adjusting to, sorry):
- python3
- python3-pip
- python3-dev
Ensure that the version of Python is 3.5 or higher. If you're using Debian, this means you need to start from at least version 9 (Stretch).
R Apparently, even after doing the above, you also need to upgrade pip:
- python3 -m pip install --upgrade pip
(On my Debian Stretch system, this produced "Requirement already up-to-date: pip in /usr/lib/python3/dist-packages", so I'm unconvinced that it is necessary at all.)
Acquire the SonOTA script and the Tasmota firmware
- Download and then unzip https://github.com/mirko/SonOTA/archive/master.zip
- cd to the SonOTA-master directory and install the additional requirements:
- pip3 install --user -r requirements.txt
You might also wish to ensure that you'll be loading the most recent version of the Tasmota firmware onto your Sonoff (rather than whatever happened to be available when the SonOTA package above was last updated), so download the current firmware from https://github.com/arendst/Sonoff-Tasmota/releases and copy it over the top of static/image_arduino.bin under the SonOTA-master directory.
Alternatively, you can update the firmware later via the web interface which Tasmota provides, once you've completed all of these instructions (you do not need to go through this procedure again when you want to upgrade Tasmota - this is only needed when you're starting from the original firmware).
Get the Sonoff into AP mode
Plug the Sonoff into mains power, and you should get a flashing blue LED towards the top right under the white plastic cover of the Sonoff.
If you press and release the white button just to the left of the flashing LED, you should get a red LED in between the switch and the blue LED to light up as well; this means that any appliance connected to the Sonoff's output pins would now be powered on. Press and release the white button again and the red LED will go out.
Pressing the white button for more than 5 seconds will cause the blue LED to start flashing more rapidly, and this means that the Sonoff has now entered AP mode - it is now acting as a wireless Access Point, accepting connections from wireless clients, and giving out IP addresses on the 10.10.7.0/24 subnet.
Put the Sonoff into AP mode and then get your computer to scan for the SSID. You have 180 seconds before the AP shuts down and the Sonoff reverts to client mode. If this happens, you just need to press the white button for 5 seconds again to get the Sonoff back into AP mode.
Connect the computer to the Sonoff's AP
R? The SSID will be of the form ITEAD-100025e356, where 100025e356 is the device ID for your particular Sonoff.
The WPA password for the AP is always 12345678.
You should get the IP address 10.10.7.2 assigned to your computer, and the Sonoff will have the address 10.10.7.1
Get the device parameters (optional)
You can check that you can communicate with the Sonoff by entering the URL http://10.10.7.1/device into a browser after connecting to its Access Point (note: the word "device" in that URL is not a placeholder for "POW" or the serial number of your device etc; it is simply the literal word "device").
You should get back a JSON snippet similar to:
{
"deviceid":"100025e356",
"apikey":"93710027-573a-4a2b-8ae2-7b76a2f20e27",
"accept":"post"
}
Yours will not be identical in content to the above but should follow the same format.
Note: just in case you can't get the Sonoff to respond to the device parameter query, note that it seems to be quite fussy about the browser request:
- Firefox works, Konqueror does not
- wget works, lynx does not
I haven't bothered to investigate what is important about the request to make it work, but just be aware that simply because you don't get a response doesn't mean that the Sonoff is faulty (or at least, it may simply be faulty by design, rather than by manufacture).
So far, I haven't actually worked out how to tell the Sonoff to connect to your Internet-connected wireless network and update itself from Itead's cloud service, like a normal user would be expected to. This also means I haven't yet found out how to check what firmware version the Sonoff is initially running.
R? Once you've checked that you can connect to the device, disconnect from the AP again, otherwise you'll have problems when you start the SonOTA Python script.
Deviations from the SonOTA documentation
I found two major differences from the documentation in the way my device tried to connect to the SonOTA Python script:
Firstly, some connection requests from the Sonoff to the Python script were to TCP port 8081, and not to TCP port 8080 as expected. There were other requests which did go to port 8080, however, therefore rather than adjusting the definition of DEFAULT_PORT_HTTP in the Python script, I applied a NAT rule on the machine listening for incoming requests:
- R iptables -A PREROUTING -t nat -p tcp --dport 8081 -j REDIRECT --to-port 8080
This allows requests coming to either TCP port 8080 or port 8081 to be serviced by the web server started from the SonOTA Python script.
Secondly, the device did not automatically start the sonoff-1234 wireless network after completing the firmware update process - I had to use the button on the Sonoff to get it into AP mode again (4 short presses), after which I could connect.
Run the SonOTA updater (this is what uploads the Tasmota firmware)
Once you know that the laptop can connect to the Sonoff, and you've installed all the tools needed on the laptop to update the device, you can start the firmware update process.
First of all make sure you are not connected to the ITEAD-100025e356 wireless network, otherwise the script will complain and not perform the initial configuration step.
If your computer has one wireless and one cabled network connection, make sure you are not connected to anything on the wireless interface. If you have two wireless interfaces, ensure that only one of them is connected to your local network.
Run the Python script from the SonOTA-master directory:
- ./sonota.py
This will prompt you for the IP address of your computer to which the Sonoff will connect via your wireless network, and will ask for the SSID and password of the wireless network it can use for this connection.
R? You will then be prompted to connect this computer to the ITEAD-100025e356 wireless network (you should get the IP address 10.10.7.2 again), at which point the script will upload these parameters to the Sonoff. You must remain connected to your local network on the other interface during this time.
The Sonoff will then stop acting as an Access Point and connect instead to the wireless network with the SSID and password you provided above, and request the first part of the firmware from the SonOTA script (which is still running).
R? You may as well disconnect your computer from the ITEAD-100025e356 network at this point (it no longer exists, and won't be coming back).
Once the first stage firmware update is complete, the Sonoff will disconnect from the wireless network and restart in Access Point mode, but this time with the SSID FinalStage (with no encryption / authentication) and giving out DHCP addresses in the 192.168.4.0/24 network.
R? You should then connect your computer (still running the SonOTA Python script) to this new network, and acquire the IP address 192.168.4.2.
The Sonoff will then download the final part of the firmware from the SonOTA Python script, after which the SSID FinalStage will disappear, and should (according to the documentation) be replaced soon afterwards by an SSID of the form sonoff-1234 (again with no authentication or encryption).
If instead you see the FinalStage SSID disappear, and then get replaced (rather intermittently) with an SSID of the form ESP_5EA60C, simply press the Sonoff's button 4 times quickly to get it to start the AP with the correct SSID.
R? You should connect to this new Access Point and acquire an IP address 192.168.4.2.
Point a browser at the Sonoff's address 192.168.4.1 to enable you to complete the final configuration of the device.
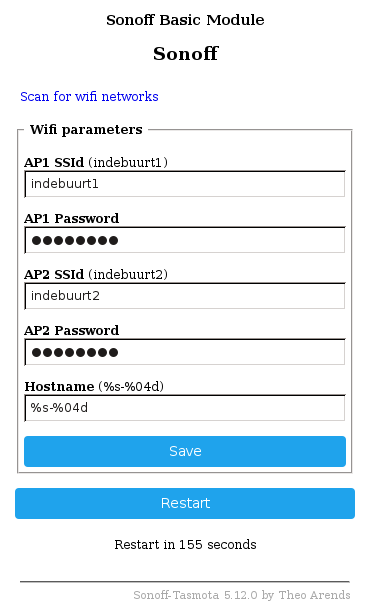
Enter the SSID and password for your standard wireless network (I also changed the SSID and password for the secondary network to "none") and set the device hostname if you wish. Click on "Save" and the device will restart and immediately connect as a client to your local wireless network, after which the configuration screen has a lot more options:
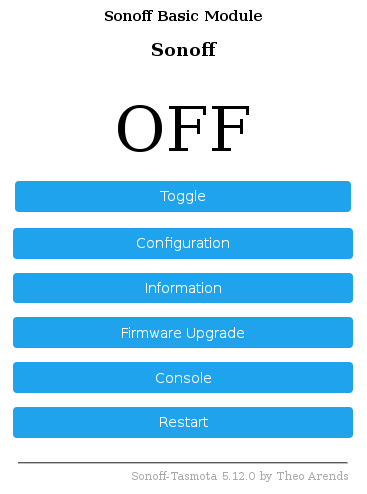
Do make sure to set the correct device model (06 - Sonoff Pow) in the Configuration / Configure Module menu, otherwise apart from anything else the blue status LED won't work correctly.
None of the above involves any connection to the Internet.
Configuration hints
- Under Configure Module make sure you define the device as being a Sonoff Pow
- Under Configure WiFi give the device a meaningful hostname, and write the hostname on the device
- Under Configure MQTT set the client name and the topic to the same as the hostname, and set the full topic to %topic%/%prefix%/ or possibly Network/%topic%/%prefix%/ where Network is the name of your local network (in case you will also be communicating with other devices on other networks)
- the default setting of %prefix%/%topic%/ is somewhat silly because it means you need to send commands to "cmnd/SonoffOne/Power" instead of "SonoffOne/cmnd/Power" etc. - the second makes far more sense once you are working with multiple devices.
- if you look in the Tasmota source code (Sonoff-Tasmota-5.12.0/sonoff/userdefs.h) you will see that the example full topic is given as tasmota/bedroom/%topic%/%prefix%/, which matches my suggestion of Network/%topic%/%prefix%/ above
Safety note
Remember not to remove the bare wires from the connector on the Sonoff before removing the mains plug from the socket.
Next steps
- Set up an MQTT broker (probably using Mosquitto)
- Talk to the Sonoff and hopefully get some responses back again - in progress
- Be sure to read this page too - it tells you about extra commands not mentioned above
- Calibrate the voltage/current/power measurements (several Sonoffs plugged into the same supply will by default show noticeably different readings - they should at the very least show the same reading, and preferably also the correct reading)
- Find some sort of home automation software to make the things useful
- Ideas so far are Node RED and Home Assistant
- Influx + Grafana looks good too
- One nice aspect of MQTT is that given a queue with data from the Sonoffs (or other sensors) going in, you can have multiple subscribers taking the data out and processing it in different ways - so you can use all three of the above at the same time, without any being dependent on the others - they just all take their data from MQTT and do what they want with it.
- https://github.com/stefanbode/Sonoff-Tasmota looks interesting as well
Sometime I also plan to try building the Tasmota firmware from source myself, based on https://github.com/arendst/Sonoff-Tasmota/wiki/Arduino-IDE
Go up
Return to main index.